Showing posts with label tips. Show all posts

Thursday, November 1, 2012

Turkey tips - what NOT to do

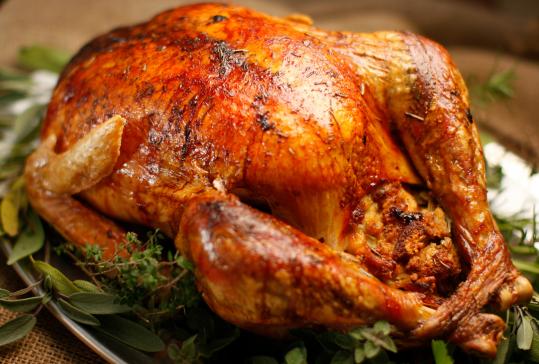
The photo-op turkey
These tips were published last year in Food & Wine, but they're still good advice for the coming holiday. I cook four turkeys every Wednesday before Thanksgiving to feed about 80 people at St. Paul's Memorial Church. Please join us if you can; we ask those who are planning to come to call the office at (434) 295-2156 and let us know what side dish you'd like to bring.

I've taken the liberty to add some of my own hints to Alessandra Bulow's excellent ones.


5 Easy Ways to Ruin the Thanksgiving Turkey
BY ALESSANDRA BULOW | POSTED NOVEMBER 10, 2011 

You’ve reserved a beautiful bird, found a big enough pan (that fits in your oven!) and purchased an instant-read thermometer to roast your Thanksgiving turkey to a perfectly moist 160–165°F—but there's still room to go wrong. Here, F&W’s Senior Recipe Developer Grace Parisi reveals the biggest turkey mistakes made by home cooks.

For a better-tasting bird, divide and conquer
1. Overstuff the cavity. By the time the stuffing reaches a safe temperature (165 °F) in an overstuffed bird, the white meat will be totally dried out. Parisi’s rule of thumb: Cook no more than five cups of stuffing in a 15-pound bird and bake the rest in a separate dish. She also stuffs the neck, which won't increase overall cooking time.
My advice: Cook the stuffing, made with the broth from the giblets, in a casserole, and make a good gravy from the drippings to go over it.

2. Crowd the oven. Like a teenager, a roasting turkey likes privacy and space. Baking casseroles and other foods with the bird disrupts oven temperature and alters your turkey’s expected cooking time. Also, if the bird is placed too close to the top of the oven, the breast will dry out and the skin will burn; you should remove some of the higher oven racks to make room.
My advice: If your sides don't involve Parmesan or bread products, cook them ahead of time and warm up in the microwave. If they have a topping that needs to be crispy, cook them to almost done and cool.  Cook the turkey, take it out and cover it loosely, then turn up the heat. Take out the dishes that need oven time and cook 15 minutes or until bubbly.

3. Check the bird obsessively. Opening the oven door cools down the oven so much that you’ll end up increasing the cooking time by a lot.
My advice: Forget about basting. Brine or season well, make sure the skin is dry then well oiled, and don't overcook. Take it out when the instant read thermometer hits 160 degrees - it will gain another 5 degrees as it rests. If you really want the breast moist and the legs done, and don't need the bird for a photo op, separate them and cook the legs long and slow on the stove or in a crock pot, the breast in the oven. This also cuts down on the cooking time.

4. Carve the turkey immediately. Turkey needs to rest for at least 30 minutes to keep the juices from flowing out of the bird and drying out your meat. Resist the urge to carve right away and go freshen up. If guests aren't already waiting for you, they'll certainly be there soon.
My advice: That half hour is also a good time to finish the side dishes you've partially prepared in advance.

5. Brine a kosher turkey. Since a kosher turkey has already been treated with salt, brining it will yield an overly salty turkey.
My advice: Don't brine any turkey that says it has up to 15 percent saline solution added.

Wednesday, September 16, 2009

Rubber rubs some the wrong way

Latex allergies are not common, but we should be aware that some do suffer from them and adjust accordingly when preparing food for strangers. I got this letter after my recent tips column on using thin latex gloves to protect the hands when making meatloaf and using the heavy ones for dishwashing to open jars.

Lori,
I caught your tips on using natural rubber latex gloves or plastic when preparing food, washing utensils, or opening a tough jar lid. It would be great for us with natural rubber latex allergy if you would promote the use of plastic, vinyl, or nitrile gloves when preparing food or handling dishes and utensils used to prepare foods. It really is unnecessary to use latex when there are so many alternatives available. There are latex free heavy duty nitrile dishwashing gloves made that serve the same purpose as the regular latex dishwashing gloves without the possibility of inducing a severe latex allergic reaction. Many with this allergy do not discover it until it has become life threatening. Often it mimics food poisoning, or a bad case of stomach flu after eating latex contaminated food.

Most people understand the severity of peanut allergies, and would not let a peanut allergic person eat a food prepared on a counter or off dishes that had been contaminated with peanuts. Likewise, those of us with natural rubber latex allergy react with life threatening anaphylaxis if we are served foods contaminated with latex proteins.

I wanted to let you know that NIOSH publications recommends that latex gloves not be used routinely when other options are available.
http://www.cdc.gov/Niosh/98-113.html

Six states have passed laws to ban the use of latex gloves in food service due to the allergens present that are transferred to food, utensils, and dishes that cause severe allergic reactions to latex. The gloves also sensitize individuals resulting in workers compensation claims due to developing an allergy to natural rubber latex.
http://www.latexallergyresources.org/Newsletter/newsletterArticle.cfm?NewsletterID=18

Information at:
The American Latex Allergy Association: Provides resources for people allergic to natural rubber latex, including latex free alternative product lists, informational packets, support groups, and a newsletter. http://www.latexallergyresources.org

Latex Allergy Links
Comprehensive current data base of resources, msg. board,
"What's New" is a good link to check
http://latexallergylinks.tripod.com/

Many of us are devastated after developing natural rubber latex allergy, I wasn't a healthcare worker, or someone who thought they were at high risk of developing this allergy. I did have a few surgeries that exposed me to this allergen, now I am totally disabled due to the severity of this allergy. I can no longer even attempt to eat at a restaurant due to the many foods bought from suppliers that use latex gloves, or the use of latex gloves in restaurants that contaminate my food.

My mission is to keep others safe from developing this allergy, and to offer safe places to eat for others not as severely affected by this allergy as I am.
I own a web based support group for those allergic to natural rubber latex, sadly our membership continues to grow: http://groups.yahoo.com/group/LAForum/

~ Ora Ruppel
Owner/moderator LAForum
lafer@sbcglobal.net

Monday, August 17, 2009

Vegetable and fruit tips

  • Never put tomatoes in the fridge. It changes their cell structure and causes them to get mealy. (This is one reason that tomatoes picked green and shipped cold don't ever taste as good as garden tomatoes.) And if you are having a hard time slicing them, sharpen your knife. (Tip from the class: Serrated knives work well, too.)
  • Many vegetables, including corn on the cob, are best cooked in the microwave. You can put two ears in, unshucked, cook for 3 minutes, shuck and remove silk easily, then finish on the grill. Brush with butter or oil with your favorite seasonings before serving.
  • To keep cauliflower white while cooking, add a little milk to the water.
  • For truly clean leeks, chop them first, then give them a bath in cold water and drain in a colander.
  • If you need only 1/2 an onion, save the root half. It will last longer.
  • When tossing a salad with a basic vinaigrette, always make the vinaigrette at least 1/2 hour ahead of time and let the mixture sit to allow the flavors to marry. Pour the vinaigrette on the chopped additions to the greens -- tomatoes, cucumbers, radishes, carrots, sunflower seeds, sprouts, etc. -- not directly on the greens, and toss, for a more evenly dressed salad. If you want to plate a salad ahead of time, don't use a vinaigrette. Sprinkle chilled, crisp greens with sea salt, pepper, herbs and a a little fine extra-virgin olive oil, and toss to coat. The salad won't wilt.
  • If you do have to use a plastic bag to store greens, wash and wrap them in dry paper towels. They will keep longer.
  • Romaine and leaf lettuces are loaded with vitamins compared to iceberg. They have has three times as much Vitamin C and six times as much Vitamin A.
  • When buying cabbage, look for heads that appear heavier than their size with crisp leaves.
  • Buy mushrooms before they "open." When stems and caps are attached snugly, mushrooms are truly fresh.
  • When picking a melon, smell it for freshness and ripeness. Check to see that the fruit is heavy for its size and that the spot on the end where it has been plucked from the vine is soft.

Monday, August 10, 2009

Hot weather tips

  • Stuff a miniature marshmallow in the bottom of a sugar cone to prevent ice cream drips.
  • Marshmallows won't dry out when frozen.
  • Thaw frozen meat and poultry in the refrigerator and not on the kitchen counter where bacteria can grow.
  • Soak wooden skewers in water for 30 minutes before using them so they won't burn during cooking. To keep food from slipping off during cooking and turning, use two parallel skewers rather than a single skewer.
  • Drinkable ice packs keep a lunch cool: Fill a 12-ounce plastic bottle about halfway with drinking water and freeze it overnight, tilting the bottle so the water will freeze at an angle (if you freeze it straight up, the expanded water will make the bottle bulge). Next morning pack the lunch, add more drinking water to the bottle, and stick it in the lunch box to keep the food cool. It will be ready to drink by lunchtime.
  • When picnicking, keep cold foods as cold as possible and hot foods as hot as possible. Be aware that bacteria on food will rapidly multiply when left at temperature between 45 F and 140 F. Wash your hands thoroughly and often.

Tuesday, August 4, 2009

An egg-stra tip

About that tip on using a funnel to separate an egg: I don't know if was because I was using a larger funnel than usual, or if the egg was older and the white was sticking more to the eggshell, but when I cracked the egg into the funnel, the yolk blocked the neck of the funnel and the white just sat on top of it. I was able to salvage and separate the egg by pouring it back into the shell, but so much for a time-saving tip, at least when using a larger than normal funnel and a less-than-right-out-from-under-the-chicken egg.

Monday, August 3, 2009

Egg tips

When slicing a hard-boiled egg, try wetting the knife just before cutting. If that doesn't do the trick, try applying a bit of cooking spray to the edge.

Use a funnel to separate raw eggs. The white will drop through and the yolk will stay in the funnel.

For the perfect boiled egg, cover eggs with cold water, a pinch of salt and a teaspoon of vinegar. Bring the water to a full, rolling boil. Remove the pan from the heat and cover. Let the eggs sit for 20 minutes. Drain the water and place the eggs in ice water to cool to stop the cooking process.

When in doubt about an egg, make this test: add 2 teaspoons salt to a cup of water and put the egg in it. A fresh egg will sink, a doubtful egg will float. (Tip from the Shrine Mont class: Hard boiled eggs spin fast, raw more slowly.)

Egg whites should always be at room temperature before whipping. Be certain there is no yolk in the whites and that the bowl and beaters are perfectly clean. Cream, on the other hand, should be well-chilled. For the largest volume, chill the bowl and beaters before whipping.

Monday, July 13, 2009

Monday tips

I said I'd post the best tips from my Shrine Mont seminar, but it lasted an hour and I couldn't tell which were the best. So I'm going to list a few each Monday for the next few weeks. And I'd love to hear yours. If you don't want to leave a comment on the posts, just e-mail me at lori.korleski.richardson@gmail.com and I'll share them, too.

  • Instead of the water your recipe calls for, try juices, bouillon, or water you've cooked vegetables in. Instead of milk, try buttermilk or yogurt. It can add a whole new flavor and improve nutrition.
  • Get into the habit of measuring the oil you use while you cook, rather than just pouring it out of the bottle. It will be easier to moderate the amount you use. Or use an oil mister.
  • When sautéing, use a small amount of chicken broth or wine instead of butter or oil, especially if you don’t care if it browns. Don’t add too much liquid at a time, or you will boil the food instead of sautéing.
  • To make fat-free broth, chill your meat or chicken broth. The fat will rise to the top, and you can remove it before using the broth.
  • In cooked spaghetti sauces and salsas, carrots do a more effective and nutritious job of sweetening than sugar.

Tuesday, June 2, 2009

Prepping food for easy meals

Here are some tips that you can do after shopping that will save you time on weeknights after work.

Green beans: Snip the ends off. Bring a pot of water to a boil and put a drain insert or steaming basket in it. When the water is boiling well, put the beans in. Get a bowl of ice water ready. When the water comes back to a full rolling boil, take the beans out and put them in the bowl of ice water. Drain and store in the fridge for up to three days. To prepare, heat a tablespoon of butter or olive oil in a skillet, add beans, season with salt and pepper (and garlic or black bean sauce if you desire) and saute until heated. Serve. Top with a tablespoon of crumbled bacon, toasted sesame seeds or slivered almonds if desired.

Lettuce: Wash the heads thoroughly when you get them home and shake dry. If the bottom has turned brown, cut a 1/4 inch or so off. Wrap the lettuce in paper towels and put back in its plastic bag (clean the bag out first if the lettuce was especially dirty). You can even tear the leaves for salad if you plan on using it all in a day or two. Still, be sure to wrap the lettuce in paper (or cloth) towels. But don't use a metal knife and cut it; it will discolor rapidly.

Asparagus: If you like grilled asparagus, cook a pound or two at a time. Be sure to snap off the bottoms; they will naturally break where the tender part starts. Cook it about 8 minutes or until crisp-tender, no more. You can reheat it in the microwave (if it seemed a little bitter to you the first time, try reheating it in milk - that smooths out the taste) or use it cold in a salad or with a drizzle of lemon and butter and a poached egg on top.

More to come as I think of them.

Later this week, we will be gone a few days to see my nephew graduate; if I don't keep up my posts then, please check back after June 9 for sure.


Tuesday, May 26, 2009

Food and kitchen tips

My Uncle Vernon passes along a little something in his e-mails to me each day. A lot of times, it's just a joke or two, but today's offering is worth passing along to you (with a bit of editing to make it more food-oriented and more about healthful eating - but if you really want the Snickers bar and apple dessert recipe, click on the comments section below, leave a message, and I'll post it tomorrow).

  • Peel a banana from the bottom and you won't have to pick the little "stringy things" off of it. That's how the primates do it. 
  • Take your bananas apart when you get home from the store. If you leave them connected at the stem, they ripen faster. 
  • Store chunk cheese in aluminum foil. It will stay fresh much longer and not mold.
  • Peppers with 3 bumps on the bottom are sweeter and better for eating. Peppers with 4 bumps on the bottom are firmer and better for cooking. 
  • Add garlic immediately to a recipe if you want a light taste of garlic and at the end of the recipe if your want a stronger taste of garlic. 
  • Heat up leftover pizza in a nonstick skillet on top of the stove, set heat to med-low and heat till warm. This keeps the crust crispy. No soggy micro pizza. 
  • Put cooked egg yolks in a zip-seal bag. Seal, mash till they are all broken up. Add remainder of ingredients, reseal, keep mashing it up mixing thoroughly, cut the tip of the baggy, squeeze mixture into egg. Just throw bag away when done - easy clean up. When you buy a container of cake frosting from the store, whip it with your mixer for a few minutes. You can double it in size. You get to frost more cake/cupcakes with the same amount. You also eat less sugar and calories per serving.
  • (Note from Lori K: If you buy natural peanut butter and can't seem to stir it well enough to mix the oil and the solids, a whirl around in the food processor for a few seconds will keep it mixed and easy to spread once it's in the fridge.)
  • Before you pour sticky substances into a measuring cup, fill with hot water. Dump out the hot water, but don't dry cup. Next, add your ingredient, such as peanut butter, and watch how easily it comes right out. 
  • To get rid of pesky fruit flies, take a small glass, fill it 1/2" with apple cider vinegar and 2 drops of dishwashing liquid; mix well. You will find those flies drawn to the cup and gone forever!